 Global Preferences
|
Global Preferences determine how the CyberAudit-Web Enterprise system will operate as a whole.
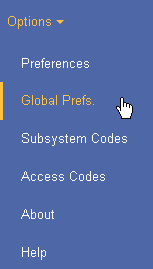
The Global Preferences page is available to
the head administrator by selecting Global Prefs from the Options menu. The Global Preferences page is divided into several sections accessible by a selector. |
|
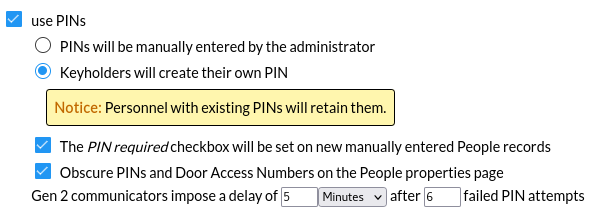 PINS are used as another layer of key security. When a user presents a key to a communicator, they may be prompted for a 4-8 digit PIN. Check the use PINs checkbox to enable PINs in the system. Then there are two modes for managing them:
|
|||||
 The Cyber Access app caches permissions to open CyberLock Blue/NFC CyberLocks. In this way, it behaves like a CyberKey which caches permissions to open CyberLocks and enables it to open locks when the mobile device cannot connect to the server. Expiring the Cyber Access cache serves the same purpose as configuring a rolling expiration rule for a CyberKey by adding a level of control to users who might choose to turn off networking on their devices. The Cyber Access app attempts to update from its account(s) every three hours or after it connects to a CyberLock Blue. At this time it uploads its audit trail events and updates its access permissions from the server. 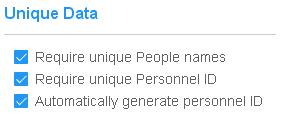 Unique People names within a system help ensure audit trail data clearly represents the person responsible for generating each audit trail event. When unique People names is not possible, a unique personnel ID can help reference the correct person through a report. CyberAudit-Web can, if desired, automatically generate a unique personnel ID for each new person added. Personnel ID may also be used as a cross reference to a centralized personnel management system. CyberAudit-Web People can be updated using the importing process or via a remote custom program using the CyberAudit-Web XML-RPC core web service SDK. |
|||||
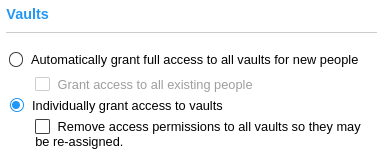
People must be granted permission to access vaults before they may use them to check out a CyberKey. The default on new systems is for all people to be automatically granted access to all vaults via the Full Access schedule when a person or a vault is added to the system. Existing systems may not have this option selected. Select between automatically granting full access or granting individual access. For each option, an additional checkbox will cause CyberAudit-Web to grant access to or remove access from all people when the administrator clicks Save. The action to revoke access also revokes access to people tags. The action to grant access grants full access to individual people, not people tags. |
|||||
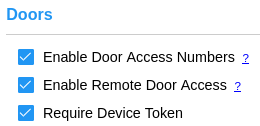
If the account is configured to use doors, checkboxes enable Door Access Numbers and Remote Door Access. Checking 'Require Device Token' helps ensure the link to open the door may only be used by one device. |
|||||
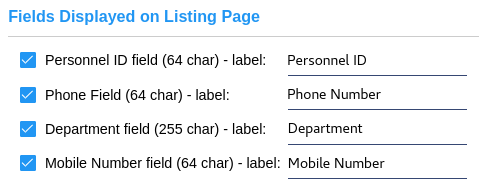
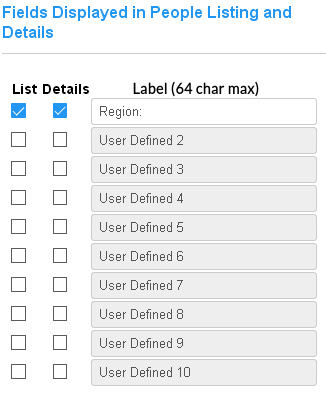
Enables optional details for people records and allows custom labels. These fields will be displayed in the people listing and details page. |
|||||
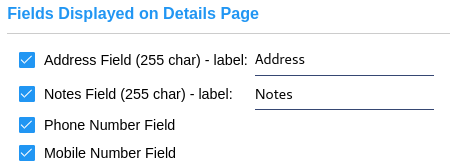
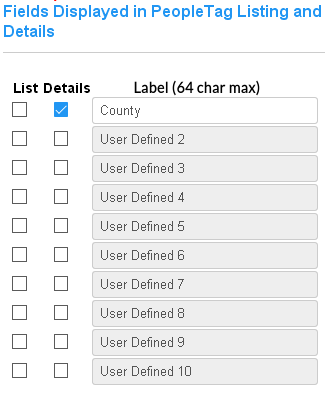
Enables additional optional details for people records and allows custom labels. These fields show in the details page only. |
|||||
Enables additional user-defined fields for people and people tag records with custom labels. These fields hold string values by default. With the Dynamic Tags SEM, they may be enabled and defined with other data types and constraints. |
|||||


|
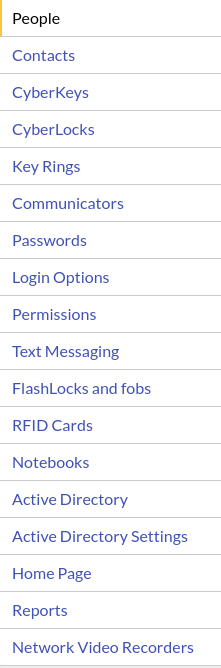
Home Page Contacts CyberKey Preferences CyberLock Preferences Key Ring Preferences Communicator Preferences Password Preferences Login Options Permissions Preferences |
Enable Text Messaging FlashLock and fob Preferences RFID Card Preferences Notebook Preferences Active Directory/Azure AD Setup Customizing the Home Page Report Preferences Network Video Recorder Preferences |

|
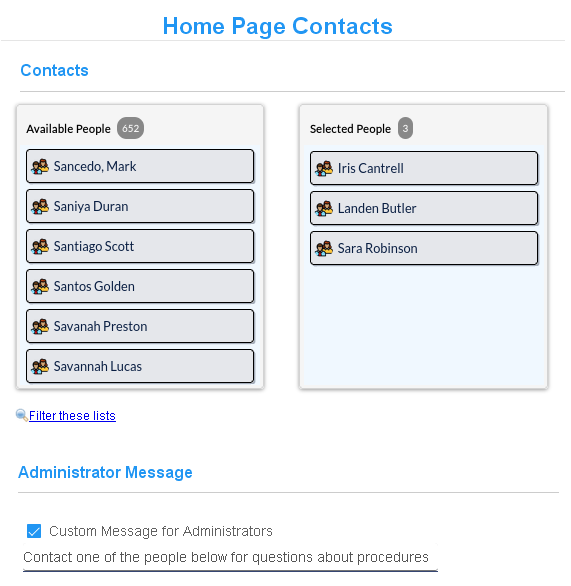
Contacts are people that appear
in the Contacts widget and can be added to the
Home page. They can help other
administrators with questions about
the use of the CyberAudit-Web system. Administrators of hosted systems may
add contacts from the system manage
section. To add contacts, use the
item chooser to select designated
contact people for the system. Only the contacts who are
visible to the administrator will
appear on the Home page.

A default message for contacts is shown above. A new message may be entered in this section. It may be up to 64 characters in length, including spaces. |
|
People Preferences CyberKey Preferences CyberLock Preferences Key Ring Preferences Communicator Preferences Password Preferences Login Options Permissions Preferences |
Enable Text Messaging FlashLock and fob Preferences RFID Card Preferences Notebook Preferences Active Directory/Azure AD Setup Customizing the Home Page Report Preferences Network Video Recorder Preferences |
 CyberKey Preferences
|
|
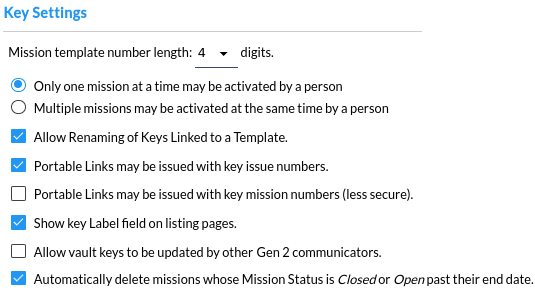
Enables setting the
mission mission template number length,
the rule for limiting mission concurrent active missions per person, and the rule for
automatically adding communicators.
|
|
People Preferences Home Page Contacts CyberLock Preferences Key Ring Preferences Communicator Preferences Password Preferences Login Options Permissions Preferences |
Enable Text Messaging FlashLock and fob Preferences RFID Card Preferences Notebook Preferences Active Directory/Azure AD Setup Customizing the Home Page Report Preferences Network Video Recorder Preferences |
 CyberLock Preferences
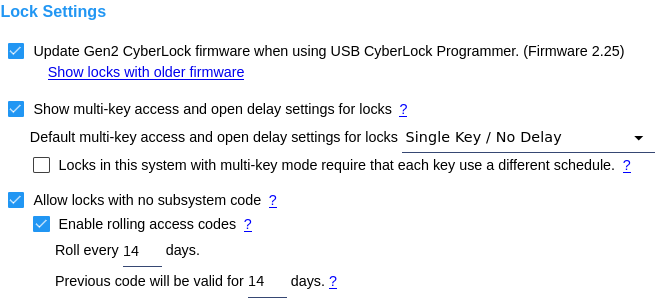
Update Gen2 CyberLock Firmware - This option toggles whether Gen2 CyberLocks in the system will get a firmware update when they are downloaded and updated using the CyberLock Programmer II. Normally this box would be kept checked unless the administrators want to postpone or don't wish to execute Gen2 lock firmware updates. Click the Show locks with older firmware link to generate a report of Gen2 locks which don't report having the current firmware. Multi-Key Access and Open Delay Settings - This option enables configuring multikey/delay settings for CyberLocks. The setting is in the Add New and Edit pages for locks and allows the administrator to change the multikey/delay settings for a CyberLock. The default setting will be used for any locks added by any administrator from the subsystem of their administrator node. Note: Multi-Key Access and Open Delay Settings are not supported by CyberLock Blue. Each key use a different schedule - The CyberLock may additionally require CyberKeys presented to the multi-key lock use a different schedule in their lock list than all the other keys participating in the attempt to open the lock. Allow locks with no subsystem code - With this option enabled, CyberLocks may be configured with no subsystem code. Enable rolling access codes - The option to use rolling access codes is enabled by a software enhancement module and must be enabled by the CyberAudit-Web hosting provider, if applicable. CyberLocks with no subsystem code may use rolling access codes for extra additional security. The settings include a frequency to roll the codes and grace period during which the previous access code will operate. Refer to the implications of using rolling access codes and associated articles before enabling these settings. |
|
|
|
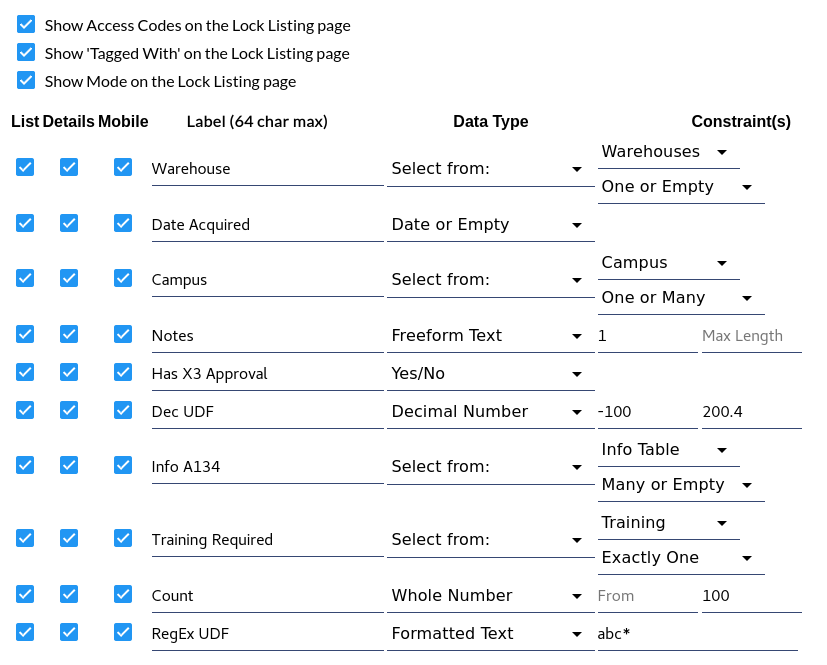
| Use this section to add and name up to ten 'user defined' fields. These fields may be viewable from the Locks and Lock Tag listing pages and/or the Lock and Lock Tag properties pages. They may be filtered from the Locks listing page, and may be included and sorted in reports. | |
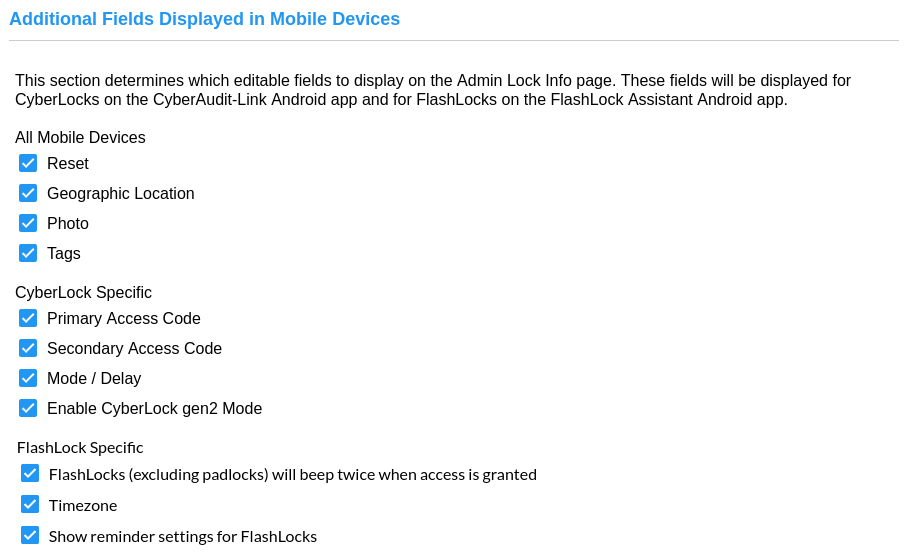
Fields may also be selected for display in various mobile apps that support Admin authentication to
manage and update lock data. This includes features such as updating a lock's photo and capturing its
geolocation. The following apps support this feature:
|
|
|
|
|
People Preferences Home Page Contacts CyberKey Preferences Key Ring Preferences Communicator Preferences Password Preferences Login Options Permissions Preferences |
Enable Text Messaging FlashLock and fob Preferences RFID Card Preferences Notebook Preferences Active Directory/Azure AD Setup Customizing the Home Page Report Preferences Network Video Recorder Preferences |
 Key Ring Preferences
|
|
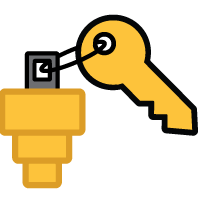
Key Rings in combination with
ValidiKey Vaults enable managing mechanical keys
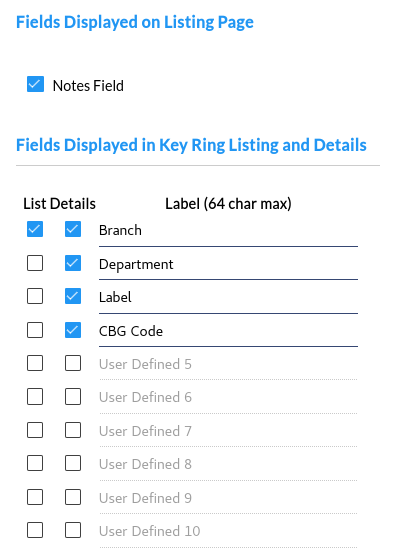
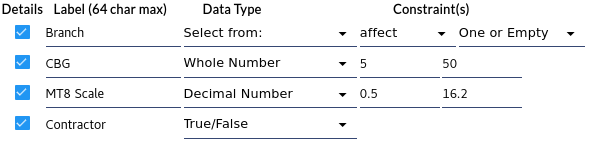
with CyberAudit-Web. In addition to a Notes field, Key Ring records may get up to 10 User Definable Fields which may be labeled in this form. The Dynamic Tags SEM enhances the form by enabling each field to have a specific data type. |
|
|
People Preferences Home Page Contacts CyberKey Preferences CyberLock Preferences Communicator Preferences Password Preferences Login Options Permissions Preferences |
Enable Text Messaging FlashLock and fob Preferences RFID Card Preferences Notebook Preferences Active Directory/Azure AD Setup Customizing the Home Page Report Preferences Network Video Recorder Preferences |
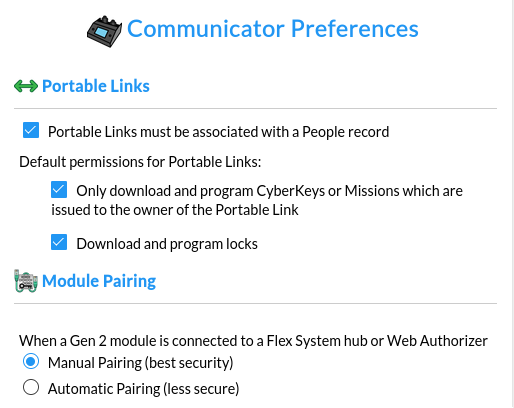
Portable Links - Binding the Portable Link to the person enables sending an issue link to the user by email or text to issue it. A portable link bound to a person may take notes for a CyberLock Blue and for other CyberLocks when using a CyberLock Programmer II with the CyberAudit Link app. The FlashLock Assistant app for Android or iOS can take notes for FlashLocks it encounters. A system may restrict the Portable Link to only update CyberKeys, missions and fobs that are issued to the same person as the Portable Link. They may also globally prevent a Portable Link from downloading and programming locks and only enable this permission for selected ones. This enables CyberAudit-Web to provide access control for potentially sensitive operations and assign accountability to them. Module Pairing - Modules connect to a Flex System or a Web Authorizer to perform tasks like program CyberKeys, scan RFID cards, capture user input from a keypad, or provide other functionality. They connect via RS-485 with a CAT 5 or later Ethernet cable. All Generation 2 Flex System modules use encryption when communicating with the Flex Controller or Web Authorizer (hereafter referred to as Hub). When a new module is plugged in it must first "Pair" with the Hub before it can be used. Pairing sends an encryption key over the RS-485/CAT5 wire and installs it into the module's persistent memory. Once Paired the module can be unplugged and reconnected to any port on the same Hub without having to Pair it again. Moving the module to a different Hub will require re-pairing. OSDP modules also use encryption and must also be paired. There are two security considerations related to module pairing.
These attacks require a high level of sophistication and specialized hardware. Both attacks can be prevented by adopting a Manual pairing policy. Manual Pairing - The CAW administrator must explicitly approve each new module. Approval can be done through CyberAudit-Web or by putting a specific file on a USB Drive. For even greater security assurance the CAW administrator can choose to use a temporary short length of CAT5 cable during pairing. This guarantees that nothing can intercept the encryption key while it's being sent to the module. Automatic Pairing - The Hub will automatically pair with any new module which appears on the wire. Both of the attacks described above are possible. |
|||||
|
People Preferences Home Page Contacts CyberKey Preferences CyberLock Preferences Key Ring Preferences Password Preferences Login Options Permissions Preferences |
Enable Text Messaging FlashLock and fob Preferences RFID Card Preferences Notebook Preferences Active Directory/Azure AD Setup Customizing the Home Page Report Preferences Network Video Recorder Preferences |

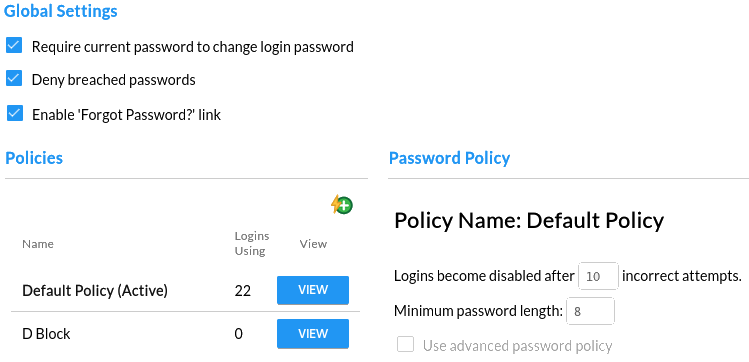 Passwords are used by administrators to log in to CyberAudit-Web. The Open Worldwide Application Security Project (OWASP) in combination with the National Institute of Standards and Technology (NIST) have specific password policy recommendations. OWASP Application Security Verification Standard 4.0.3 recommends
Password Policies - Some systems may want to have different password policy rules for different administrators. This may be accomplished by creating password policies in addition to the 'default' policy. Click the  icon to create a new policy, give it a name, and set the policy rules. Two rules apply to all policies:
Number of failed attempts - If an identified CyberAudit-Web administrator fails to enter their correct password, CyberAudit-Web begins a count of incorrect attempts. When the count exceeds the maximum, specified on this page, the login is automatically disabled. Note: The root or primary login is never disabled. In addition, failed attempts are throttled by imposing a delay after incorrectly entering the password for a login. The throttling behavior is as follows:
CyberAudit-Web sets a default value of 10 failed attempts. Minimum Password Length - CyberAudit-Web sets a default value of 10 for this field. In general, recent NIST recommendations advise that longer passwords are harder to guess and therefore more secure. Advanced Password Policies - Advanced password policies are also available. However as of 2016 NIST does not recommend such policies because they tend to cause people to create predictable passwords or write them down on paper. |
|||||||||
|
People Preferences Home Page Contacts CyberKey Preferences CyberLock Preferences Key Ring Preferences Communicator Preferences Login Options Permissions Preferences |
Enable Text Messaging FlashLock and fob Preferences RFID Card Preferences Notebook Preferences Active Directory/Azure AD Setup Report Preferences Network Video Recorder Preferences |
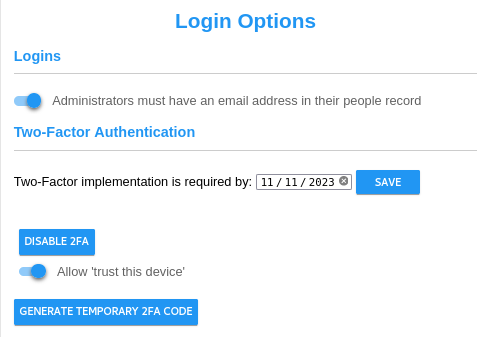
Administrators must have an email address in their people record - Enabling this slider prevents changes from being saved on the "Adding New Login" and "Edit Login" pages when the associated people record does not have an email. This feature can be useful for ensuring that CyberAudit-Web administrators can take advantage of the password reset email feature. It does not, however, apply to administrators that are created automatically through Active Directory/Azure AD integration and does not disable any pre-existing logins that do not have an associated email. In either of these two cases, a message will be displayed on related pages in CyberAudit-Web indicating which administrators do not have a required email. Allow 'trust this device' - Enabling this slider presents a 'Trust this device' checkbox to the administrator on the page they enter their 6 digit TOTP. This causes CyberAudit-Web to send information to the brower to save and use in lieu of the TOTP the next time the administrator logs in. Enable 2FA - This button (which is replaced by " Disable 2FA " when Two-Factor Authentication is enabled for the user), will take the user to the introductory page for 2FA implementation. Disabling 2FA disables for all administrators in the account. Generate Temporary code - This button is also only available after 2FA has been enabled by the current administrator. Clicking this button will take the user to tbe 'generate temporary code' page where they can create a one-time-use temporary code for lower-level logins who are not able to access their account. |
|
People Preferences Home Page Contacts CyberKey Preferences CyberLock Preferences Key Ring Preferences Communicator Preferences Password Preferences Permissions Preferences |
Enable Text Messaging FlashLock and fob Preferences RFID Card Preferences Notebook Preferences Active Directory/Azure AD Setup Customizing the Home Page Report Preferences Network Video Recorder Preferences |

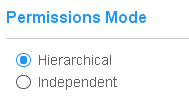
The Permission Mode setting determines how permissions can be propagated to administrator nodes. Hierarchical Mode requires that in order to have a permission, the administrator node's immediate superior must have the permission. Independent Mode does not have this restriction. |
|
People Preferences Home Page Contacts CyberKey Preferences CyberLock Preferences Key Ring Preferences Communicator Preferences Password Preferences Login Options |
Enable Text Messaging FlashLock and fob Preferences RFID Card Preferences Notebook Preferences Active Directory/Azure AD Setup Customizing the Home Page Report Preferences Network Video Recorder Preferences |

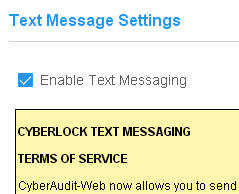
If the CyberAudit-Web system is connected to a text message service, and made available to the account in the CyberAudit-Web manage section, it may be enabled. An administrator must agree to the CyberLock Text Messaging Terms of Service before the service will become available. |
|
People Preferences Home Page Contacts CyberKey Preferences CyberLock Preferences Key Ring Preferences Communicator Preferences Password Preferences Login Options |
Permissions Preferences FlashLock and fob Preferences RFID Card Preferences Notebook Preferences Active Directory/Azure AD Setup Customizing the Home Page Report Preferences Network Video Recorder Preferences |
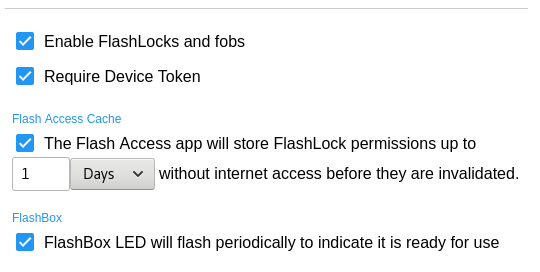
If the CyberAudit-Web system has the FlashLocks SEM, and FlashLocks are made available to the account, in the CyberAudit-Web manage section, they may be enabled on this page. An administrator must agree to the FlashLock Software Enhancement Module Terms of Service before FlashLocks and fobs will become available. Require Device Token - Flash Access is sent to a user in an email or text message. Requiring a device token ensures that only one specific device may be used by a person to open any FlashLock. The browser or Flash Access app will ask the user if this is the device they intend to use. If this box is checked, they must answer 'yes' to this question or the server will not send a flash code to the device. After they answer 'yes', any other device will be rejected by the server. If the user wants to use a different device, the administrator may clear the token. Flash Access Cache - The app can store permissions to open FlashLocks for a period of time up to 14 days. This may be useful in the event the CyberAudit-Web server is not accessible for any reason. To allow caching FlashLock permissions on a mobile device, check the box and determine the maximum amount of time to allow storing the permissions. The Flash Access app will attempt to connect to its CyberAudit-Web server whenever the app is active to verify the cached access permissions are still valid. FlashBox - A FlashBox flashes its LEDs once every eight seconds. This 'heartbeat' is an indicator that the FlashBox is functioning and its battery is OK. Uncheck the box to disable this heartbeat. |
|
People Preferences Home Page Contacts CyberKey Preferences CyberLock Preferences Key Ring Preferences Communicator Preferences Password Preferences Login Options |
Permissions Preferences Enable Text Messaging RFID Card Preferences Notebook Preferences Active Directory/Azure AD Setup Customizing the Home Page Report Preferences Network Video Recorder Preferences |

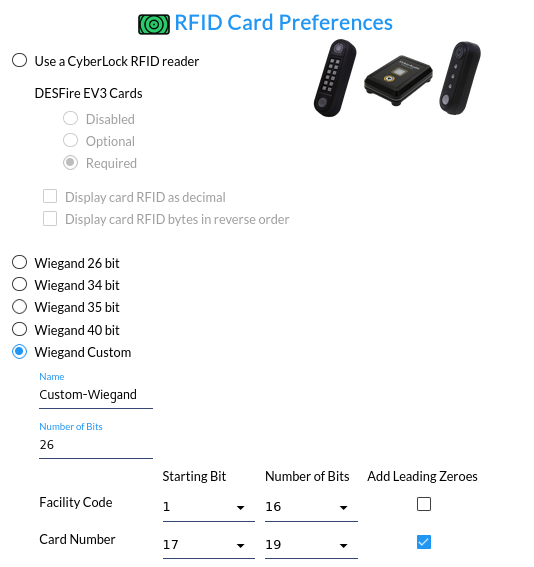
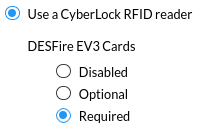
This page provides some options for RFID cards. The options affect how the card id is interpreted from manual input or from the card id column in a people import file. It may also affect how the card id is displayed in CyberAudit-Web. DESFire EV3 cards
Use CyberLock RFID Reader
CyberLock RFID readers like the Flex System RFID Reader and the
RFID reader on the ValidiKey 2 Plus read certain
high-frequency RFID cards. CyberLock readers differ from
Wiegand RFID readers because they output bytes rather than bits. Default output is
hexidecimal. The following two options apply only to CyberLock RFID readers.
Display Card RFID as Decimal - This setting may be desireable to match a card ID that is printed on a card. Display Card RFID bytes in reverse order - Again, to match a card ID printed on a card, it may be necessary to reverse the byte order returned by the reader. Wiegand 26 bit
Setting this option assumes manually entered or imported card IDs will be
for
Standard 26-bit wiegand format cards as defined by HID Corporation. These cards have 8 bit
facility codes and 16 bit card IDs. They are displayed as XXX-XXXXX. Leading zeroes are
always displayed.
Wiegand 34 bit
Uses the N1002 card format with an 8 bit facility code and 16 bit card ID.
Wiegand 35 bit
Wiegand 40 bit
40 bit wiegand cards are displayed with a decimal value for all 40 bits (5 bytes).
Wiegand Custom
This option enables defining a wiegand card format other than what's offered.
|
|||
|
People Preferences Home Page Contacts CyberKey Preferences CyberLock Preferences Key Ring Preferences Communicator Preferences Password Preferences Login Options |
Permissions Preferences Enable Text Messaging FlashLock and fob Preferences Notebook Preferences Active Directory/Azure AD Setup Customizing the Home Page Report Preferences Network Video Recorder Preferences |

|
|
|
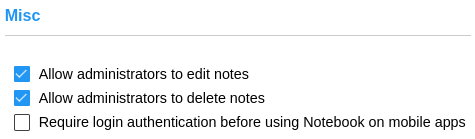
Allow administrators to edit notes -
Enabling this option allows administrators to edit existing notes.
When a note is modified, its last modified date will be updated. The
Journal of Changes keeps track of note changes.
Allow administrators to delete notes - Enabling this option allows administrators to delete notes from the system. Require login authentication before using Notebook on mobile apps - By default, notes may be added from mobile applications such as CyberAudit Link and FlashLock Assistant when the portable link is issued to a person. When a note is added, the notetaker is the person associated with the portable link. To limit notetakers to administrators with logins, check this box. |
|
|
|
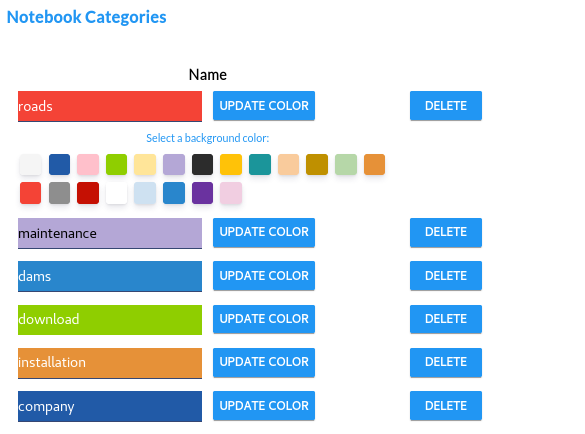
| The Notebook Categories section is used to update the category options for notes. These options will be available globally. Each category has a name and hex color that will be used to differentiate between categories easily. | |

|
Add category - Clicking this icon will add a new row to the form. |
|
Existing notebook categories can be updated. The Name and Hex Color properties can be updated.
Categories can also be deleted by clicking the 'Delete' button. Make sure to click the 'Save' button to
save your changes.
See this page for more information about the Notebook feature. |
|
|
People Preferences Home Page Contacts CyberKey Preferences CyberLock Preferences Key Ring Preferences Communicator Preferences Password Preferences Login Options |
Permissions Preferences Enable Text Messaging FlashLock and fob Preferences RFID Card Preferences Active Directory/Azure AD Setup Customizing the Home Page Report Preferences Network Video Recorder Preferences |
 Active Directory/Azure AD Setup

|
|
|
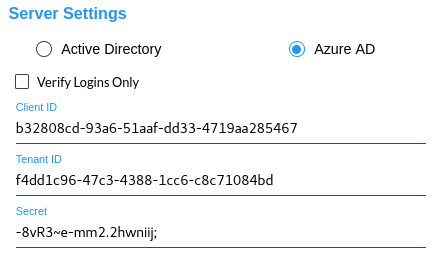
If the system has the
Active Directory/Azure AD Synchronization SEM,
this page enables setting up the connection to Active Directory® or Azure AD®. Select the desired
server type and enter the needed connection parameters. Systems with an Active Directory server behind
a firewall that supports VPN may create an OpenVPN tunnel to connect to their server.
Setting Up and Using Active Directory or Azure AD to Synchronize People Tags and People |
|
|
People Preferences Home Page Contacts CyberKey Preferences CyberLock Preferences Key Ring Preferences Communicator Preferences Password Preferences Login Options |
Permissions Preferences Enable Text Messaging FlashLock and fob Preferences RFID Card Preferences Notebook Preferences Customizing the Home Page Report Preferences Network Video Recorder Preferences |
Active Directory/Azure AD Settings

|
|
Once a connection to Active Directory® or Azure AD® has been successfully tested, an
Active Directory Settings tab will appear in Global Preferences. This page enables
selecting the groups that will be included in the synchronization as
people tags and enables mapping
a fixed set of user attributes to fields
in the people records.
Setting Up and Using Active Directory or Azure AD to Synchronize People Tags and People |
|
People Preferences Home Page Contacts CyberKey Preferences CyberLock Preferences Key Ring Preferences Communicator Preferences Password Preferences Login Options |
Permissions Preferences Enable Text Messaging FlashLock and fob Preferences RFID Card Preferences Notebook Preferences Customizing the Home Page Report Preferences Network Video Recorder Preferences |
 Customizing the Home Page
|
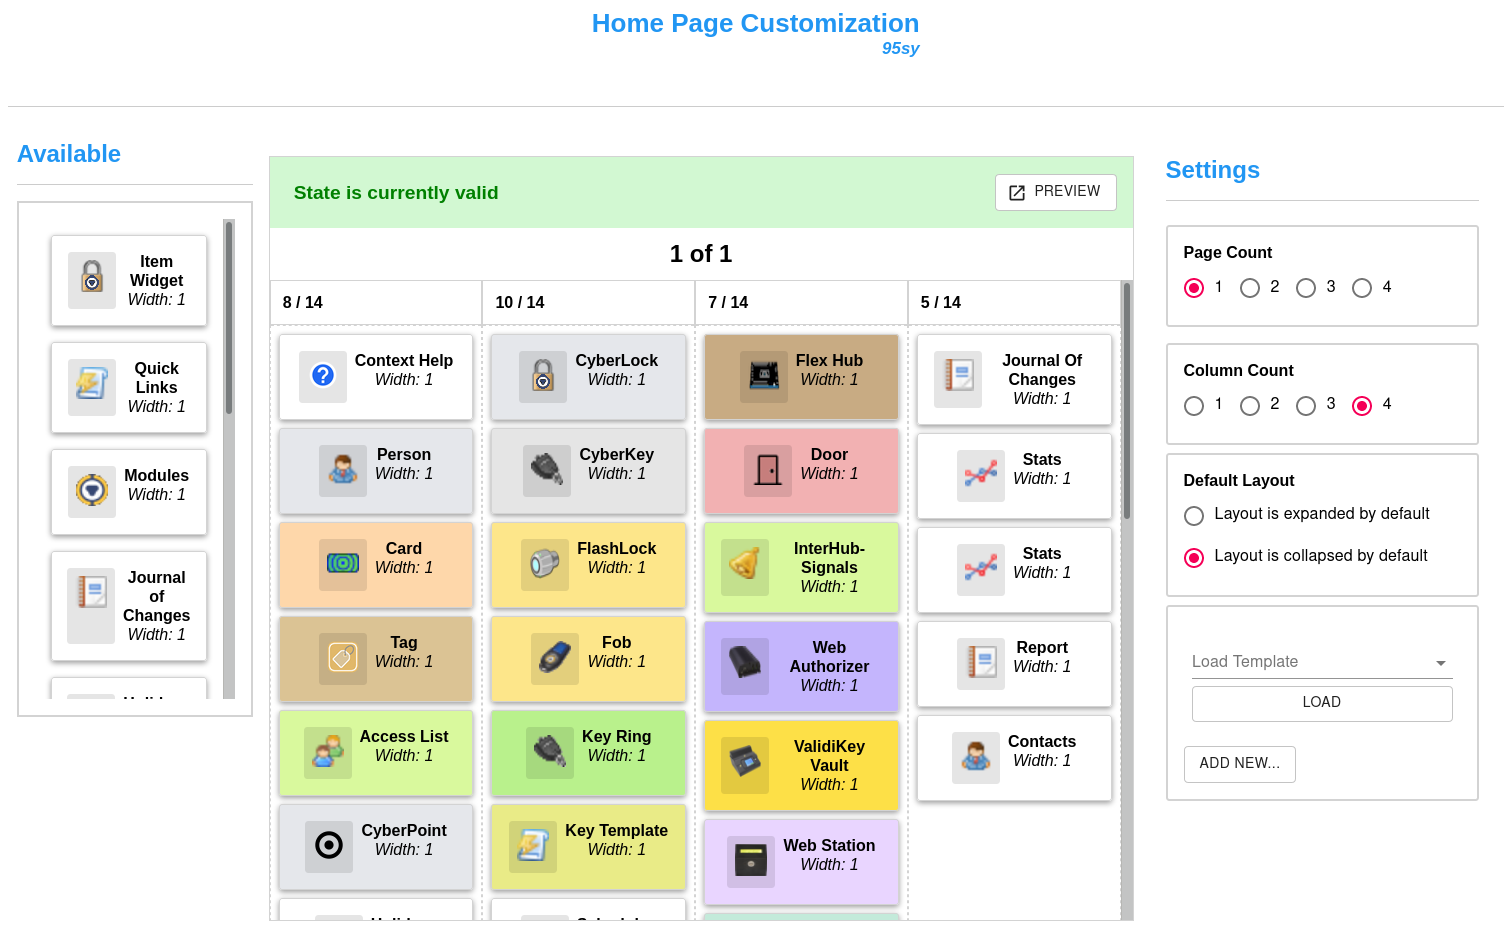
This section configures Home Page Customization. Here, the administrator can re-arrange the widget layout of the Home Page. Templates can be used to save and load custom layout configurations. |
|
People Preferences Home Page Contacts CyberKey Preferences CyberLock Preferences Key Ring Preferences Communicator Preferences Password Preferences Login Options |
Permissions Preferences Enable Text Messaging FlashLock and fob Preferences RFID Card Preferences Notebook Preferences Active Directory/Azure AD Setup Report Preferences Network Video Recorder Preferences |
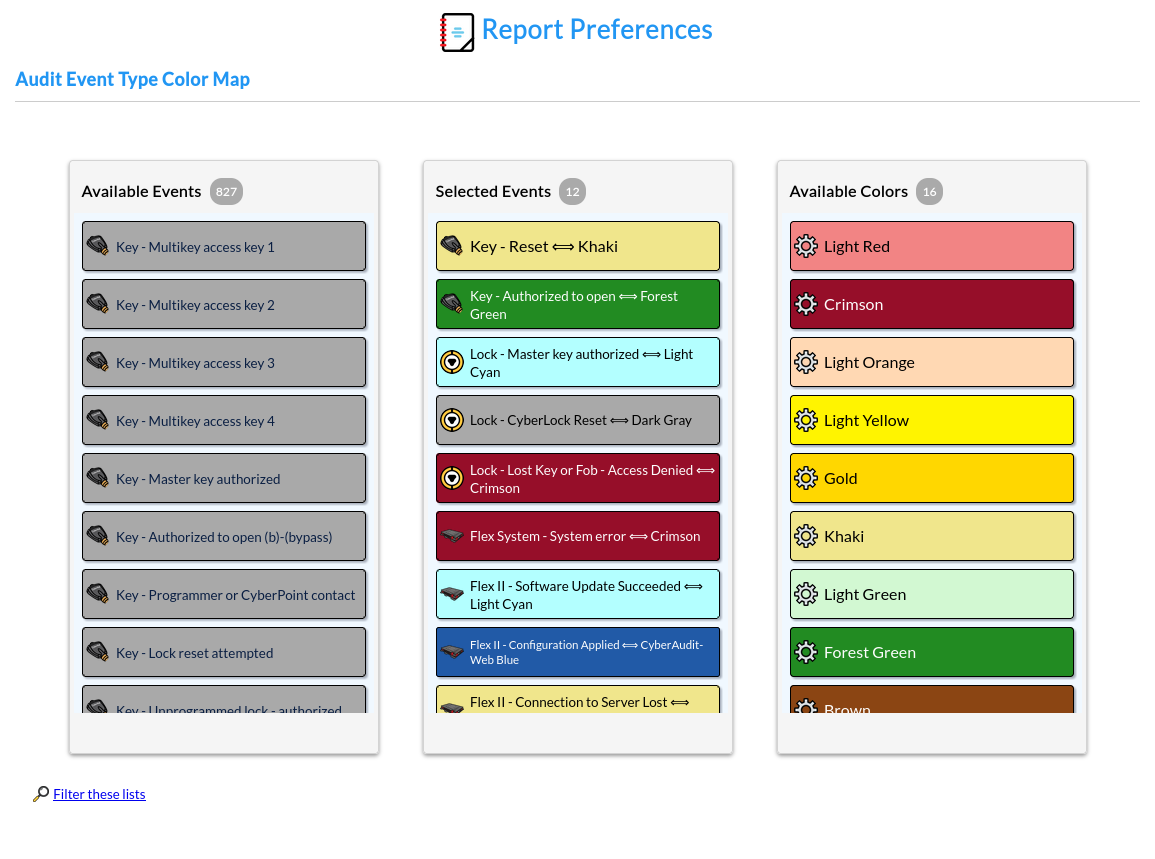
 Report Preferences
|
This section configures colors for audit event reports. Each audit event can be mapped to a color by dragging them in the 'Selected Events' column and associating a color with it. The color will be displayed for events appearing in Audit Event reports and Live View Reports. |
|
People Preferences Home Page Contacts CyberKey Preferences CyberLock Preferences Key Ring Preferences Communicator Preferences Password Preferences Login Options |
Permissions Preferences Enable Text Messaging FlashLock and fob Preferences RFID Card Preferences Notebook Preferences Active Directory/Azure AD Setup Customizing the Home Page Network Video Recorder Preferences |
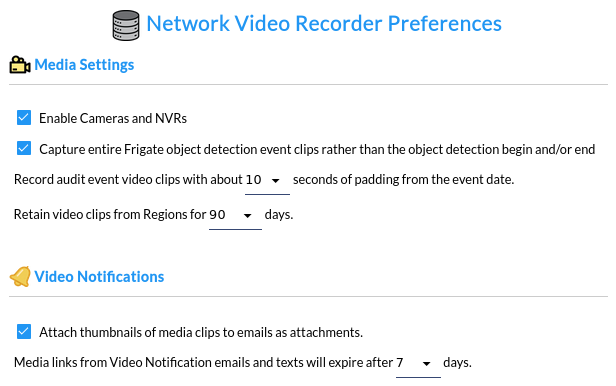
 Network Video Recorder Preferences
|
| This tab appears when the system has the
Cameras and NVRs SEM. It enables using NVRs and
adding cameras as well as adding
Video Regions.
Capture entire Frigate object detection event clips rather than the object detection begin and/or end - Frigate NVR notifies CyberAudit-Web when object detection camera events occur. When the object is detected, Frigate creates a continuous clip from when the object is detected to when that object is no longer detected. This option determines whether CyberAudit-Web will capture the entire video clip from Frigate or instead just capture the beginning and ending of the object detection. Record audit event video clips with about xx seconds of padding - This padding value sets the amount of time, in seconds, that CyberAudit-Web will add both before and after an event occurs. The range is 2 - 30 seconds. Retain video clips from Regions for x days - This input determines how long clips are stored on the CyberAudit-Web server. Video clips captured and saved by CyberAudit-Web are stored in the server's /var/caw-media folder. Files with date stamps older than the number of selected days are deleted from the server. The selector provides values from 1 - 365 days. Attach thumbnails of media clips to emails as attachments - This option applies to Region video notifications. A thumbnail can provide a quick clue to indicate what the video is about. Media links from Video Notification emails and texts will expire after x days - This setting determines the lifespan of video links sent for Video Notifications. |
|
People Preferences Home Page Contacts CyberKey Preferences CyberLock Preferences Key Ring Preferences Communicator Preferences Password Preferences Login Options |
Permissions Preferences Enable Text Messaging FlashLock and fob Preferences RFID Card Preferences Notebook Preferences Active Directory/Azure AD Setup Customizing the Home Page Report Preferences |